Let me show you exactly how to start a blog and reach global audiences.
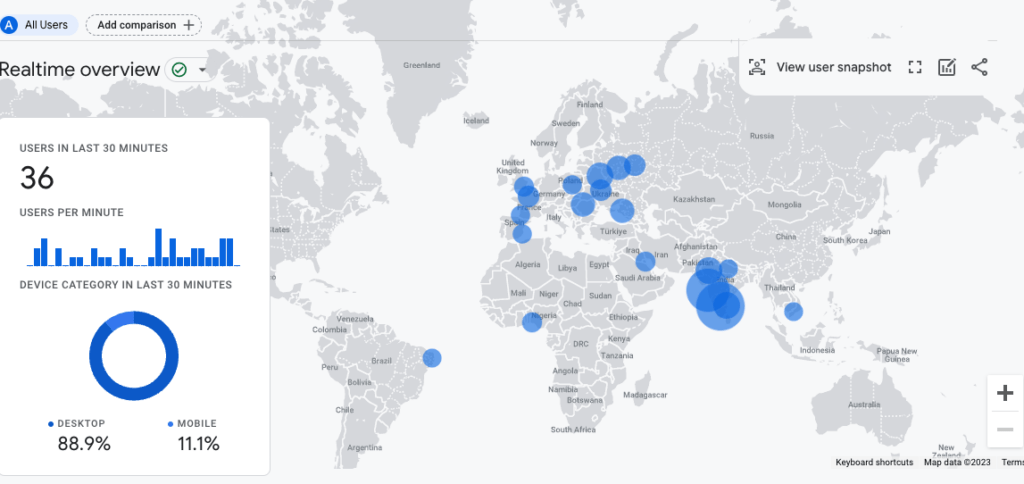
This free course is for everyone, whether you’re a beginner or have tried and failed before. It’s the perfect resource for starting a blog.
I’ve been making a living from blogging for 3 years now and I want to teach you exactly how to do that.
Here’s the process in a nutshell:
- Choose a platform
- Lock a niche
- Launch a website
- Customize your site
- Start writing blog posts
- Monetize once decent traffic
This is not your typical guide on how to start a blog. I will show you exactly what it takes, how to write posts that get traffic, how to monetize, and more.
Let’s get started!
Please note that this post contains affiliate links, but there is no additional cost to you.
Blogging in the 2020s
Blogging is an excellent way to share valuable information and get your voice heard.
However, the blogging landscape has changed drastically. A decade or two ago, blogging was mostly entertainment. You could post random content and get a large number of readers. The challenging part was to code a decent-looking website.
These days, anyone can build a blog in 15-30 minutes without coding skills at a minimal cost. It’s no longer a showcase of skill and hard work to have a blog. Instead, it’s all about providing value to your readers. Every blog post you write needs to solve a problem.
Today, people ask questions from Google. To become a successful blogger, you need to answer these questions.
This means you don’t write about random things you like. Instead, you need to figure out what people are searching for, research the topic, and write a detailed post about it.
To get a better idea of what it takes to become a blogger, here are some blogging expectations vs reality:
| Expectations | Reality |
|---|---|
| ❌ Write a post or two every week | ✅ Write multiple posts a day |
| ❌ Publish short 200-300-word blog posts | ✅ Write >2,500-word ultimate guides |
| ❌ Work 5-10 hours a week | ✅ Work 50+ hours a week |
| ❌ Build a solid audience in a month or two | ✅ Get no visits in the first 6 months |
| ❌ Make a side income with low effort | ✅ Work full-time for 1+ year before making any money |
It’s good to get the facts straight before investing time into blogging. Although it may sound hard, blogging is still one of the easiest and least stressful types of business out there. It just takes some time and practice.
Here are some great reasons why you should start a blog today.
1. Build an Online Presence
A blog is a powerful tool for building an online presence, whether you’re an individual or a business.
Here are some reasons why.
Showcase your expertise—By creating high-quality, informative blog posts on topics related to your field or industry, you can establish yourself as an expert in the field. This helps you build credibility and trust with your readers and might help you attract new clients and job opportunities.
Connect with your audience—Blogging helps you connect with your audience and build relationships with them. By engaging in conversations with your readers, you create a community around your blog and foster a loyal following.
Drive organic traffic—Each blog post you write is an opportunity to attract new visitors to your site. This increases your chances of converting those visitors into customers or loyal followers.
Building your brand—A blog helps you build a solid brand. By creating content that reflects your values and personality, you can differentiate yourself from competitors and build a memorable, recognizable brand. This is good for both individuals and many online businesses.

2. Help Others
The blogging business is all about solving problems and helping others. With a blog, you can help people who are looking for answers to problems.
Blog posts can provide in-depth information on a wide range of topics, from how-to guides to industry news and trends. By offering detailed explanations and insights, blogs can help people gain a deeper understanding of the subjects they’re interested in.

3. Learn Something New
Blogging can also be a way for the author to learn something new, despite what one might believe.
Researching for blog posts—Writing a blog post often requires in-depth research to provide accurate information to readers. This is what sets you apart from others! But it’s also a great way to learn new things.
Trying new things—Blogging might also involve writing about topics that require hands-on experience. Trying This offers a unique chance to learn new skills and expand your knowledge.
Network with other bloggers—Blogging provides opportunities to connect with other bloggers in the niche. Building relationships with other bloggers might lead to collaborations, and a chance to learn from them.
4. Start a Side Hustle

While blogging takes time and effort to get started, it can be a rewarding side hustle for people looking to earn extra income.
By monetizing your blog through advertising, affiliate marketing, sponsored content, or selling your own products, you can turn their passion for writing into a profitable business.
You can start your blog as a small side hustle.
For example, you can write a blog post every day after finishing your work. This way you can slowly build an organic audience and see if you truly like blogging or not. After a while, you can turn the blog into a full-time business.
Just remember that the results won’t be great before you commit full-time to your blog!
Own Blog vs Platform
If you’re new to blogging, using a platform like Medium.com can be a good starting point.
Blogging platforms allow you to just sign up and start writing right away.
On a blogging platform, it’s easier to build an audience. Platforms like Medium have hundreds of thousands of visitors from different industries and interests.
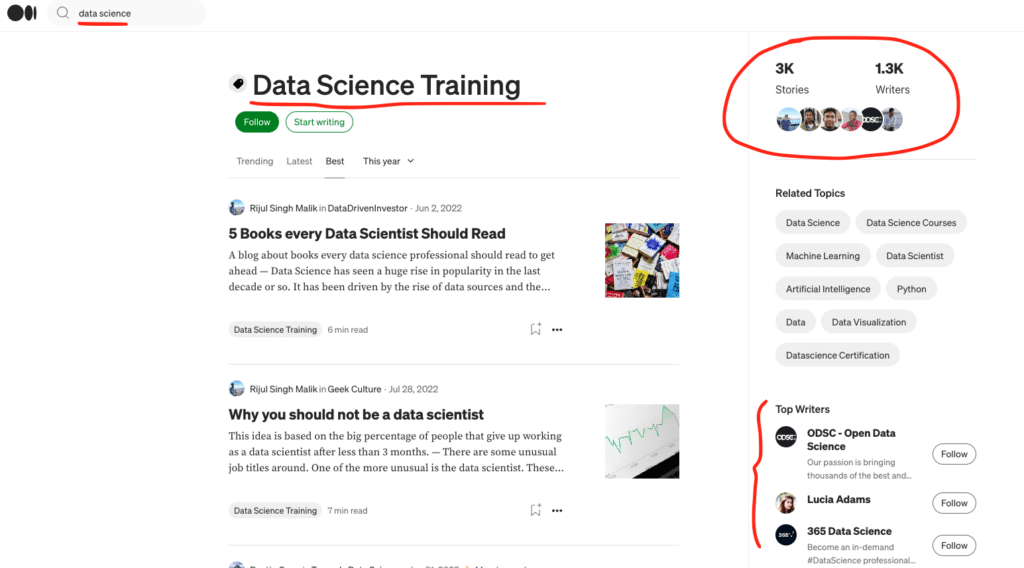
I highly recommend testing a platform like Medium before starting your own blog to ensure that you enjoy writing.
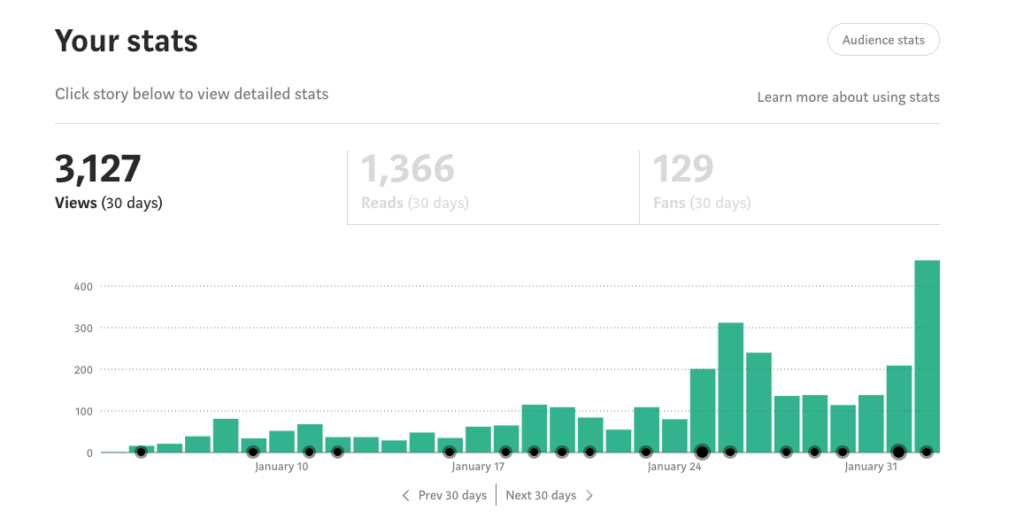
I wrote my first ~100 blog posts on Medium. In 3-4 months I was already making $2,000 a month which is close to the average salary from where I come from. And I was a complete rookie with very poor non-native writing skills.
On Medium, you can write short posts about trending topics with catchy titles, subtitles, and images. These tend to perform really well. Some of them can even go viral.
On Medium, readers aren’t searching for your posts. Instead, they scroll their feeds and get recommendations. Blogging platforms are more like social media.
This also means the success of your posts is short-lived. On Medium, once you stop writing, your visits and earnings will plummet.
This is not a problem on your own blog. Assuming your posts rank high on Google, they can stay on top for years even if you didn’t update the blog.

But on your own blog, you should focus on writing long-form evergreen content that ranks high on search engines. My best-performing blog post is 10,000+ words in length (1.5 hour read time).
Also, it takes much longer to grow your own blog. You need to write longer posts and Google (and other search engines) need months to rank your posts high.
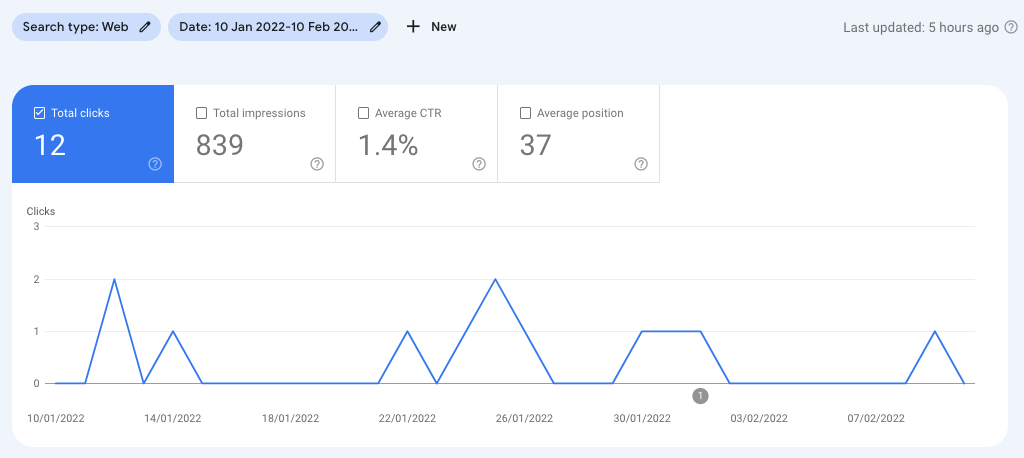
As a comparison, I got 3,000+ reads during my first month on Medium as a first-time blogger. In contrast, on my own blog, the first month brought in 12 reads.
Here are some pros and cons of having your own blog vs blogging on a platform.
Pros & Cons—Own Blog
| Pros | Cons |
|---|---|
| ✅ Full control over everything | ❌ No built-in audience |
| ✅ Keep all the earnings | ❌ Lots of technical responsibilities |
| ✅ Easy to start | ❌ Domain and hosting costs |
| ✅ Possible to build a loyal audience | ❌ Takes longer to become successful |
| ✅ An unlimited growth potential | |
| ✅ Passive income potential for years |
Pros & Cons—Blogging Platforms
| Pros | Cons |
|---|---|
| ✅ Built-in audience | ❌ No control over the content |
| ✅ Easy to start | ❌ The audience remembers the platform—not you |
| ✅ Easy to operate and use | ❌ Takes a big cut from your earnings |
| ✅ Publishing is (usually) 100% free | ❌ Limitations on affiliate marketing |
| ✅ No technical responsibilities | ❌ Theme and design limitations |
| ✅ Posts can go viral |
Now that you understand the differences between having your own blog vs blogging on a platform, you need to make a decision:
- Do you want to start your own blog?
- Do you want to start on a platform?
💡 If you’re serious about blogging, I recommend starting your own blog. It takes longer to make it work, but in the end, it’s worth it.
If you’re not sure and only want to give blogging a try, start on a platform like Medium!
To start blogging on a platform, I recommend trying Medium.com—it’s the best-known blogging platform with a huge built-in audience. To get started, read my guide to becoming successful on Medium.
From this point on, however, we will focus on building and growing your own blog.
How to Build Your Own Blog
This section is a step-by-step guide to actually building your own blog. After following these steps, you have a fully functional website and domain where you can start writing blog posts.
With 35% of websites powered by WordPress, it is undoubtedly the most popular choice for building a website. This guide teaches you how to build a blog website using WordPress.
Although there are some simpler alternatives available, choosing WordPress is the best decision in the long run. With a quick solution like Wix, you can save 15-30 minutes now but are restricted for the rest of the time. WordPress gives you more customizability and room to expand your business.
Especially because the costs are more or less the same, it doesn’t make sense to pay for a limited web hosting service.
1. Pick a Niche
Choosing a blogging niche is an important decision that can impact the success of your blog.
To pick a niche, here are some ideas you might want to consider.
Tip 1. Identify your passions
Start by brainstorming topics that you’re passionate about.
What topics do you love to read about or talk about? What hobbies or interests do you have? By choosing a niche that you’re passionate about, you’re more likely to stay motivated.
Tip 2. Consider your expertise
What skills or knowledge do you have that you could share?
Even though you don’t need to be an expert in your niche, by choosing a topic you’re good at, you can more easily write insightful stories that provide value to your readers.
Tip 3. Research your competition
Before you pick a niche, research your competition carefully!
Are there already established blogs in your niche? How are they succeeding? Are there any gaps in the market that you could fill with your own content?
By understanding the competition, you can make a more informed decision about which niche to pursue.
The best way to research your competition is by doing Google searches and checking the results.
For example, if you started a blog about disc golf, you should do searches like “How to throw a disc golf disc”. This helps you understand what’s the quality of the top search results and what you should be able to produce.
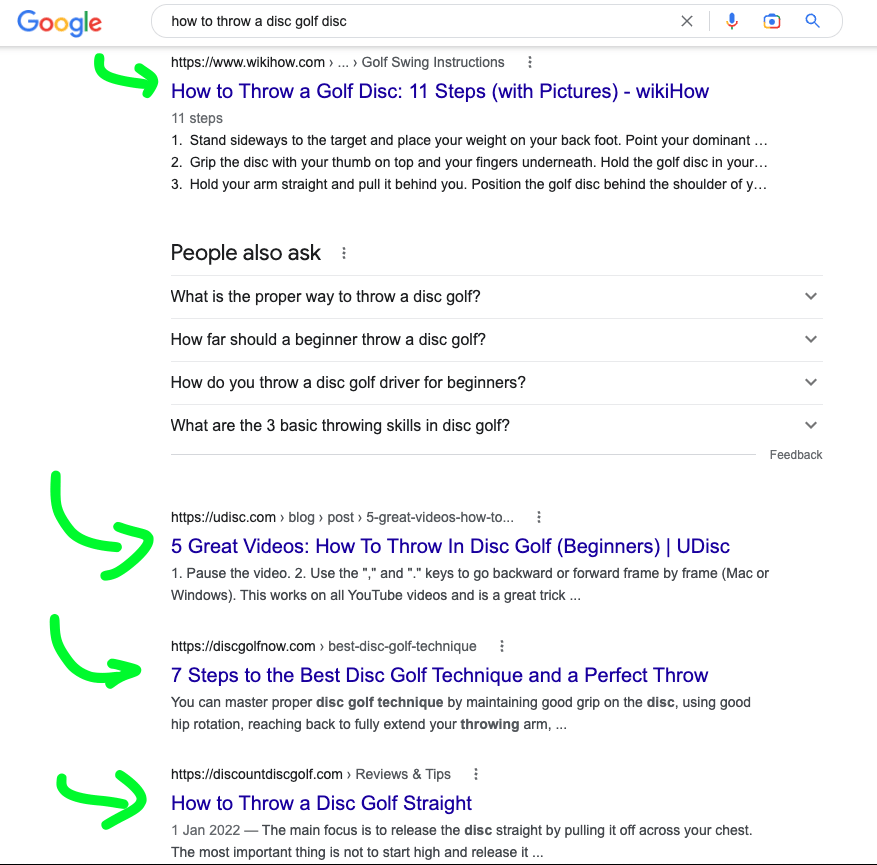
Also, make sure there are at least some results in the searches. If there are none, chances are there are not enough people interested in your topic or no money to be made.
Tip 4. Evaluate monetization opportunities
Finally, it’s crucial to consider how you can monetize your blog in your chosen niche.
Are there advertising or affiliate marketing opportunities? Could you sell your own products or services? By choosing a niche with monetization potential, you can turn your blog into a profitable business.
This is where you need to do research. I’d recommend spending some hours looking at other blogs in the niche and what they do.
Also, make sure to search for affiliate programs in your niche. If there are none, it drastically limits the earning potential of your blog.
For example, if you started a blog about disc golf, make sure to google “Disc golf affiliate program”.

By considering your passions, expertise, competition, target audience, and monetization opportunities, you can choose a blogging niche that’s right for you.
Remember, choosing a niche is an important decision, but it’s not set in stone. You can always adjust your niche over time as you learn more about what works and what doesn’t.
If you’re not 100% sure about the niche, make sure to choose the blog’s name so that it doesn’t tie you into a particular niche. A common way to name a blog without a niche is firstnamelastname.com.
💡 You don’t need to be an expert in your niche. You can just as well start blogging about something you’ve never even heard of. For example, it can be something you’ve always wanted to try or learn.
Having a blog that teaches beginners as a beginner can be valuable for the readers!
Remember: Don’t pretend to be an expert if you are not one.
Read also: How to Find the Perfect Blogging Niche.
2. Get a Domain & Hosting Plan
The first step to launching a website is buying a domain for your site.
💡 A domain is the address of your website that appears after the www. in the URL or after the @ symbol in an email address.
Come up with a short, memorable, and catchy domain name. While it can be related to your niche, it’s not a necessity.
Many bloggers choose to use their first and last name combination as the domain name. This strategy offers the flexibility to change the blog’s niche in the future as the blog’s name isn’t associated with any particular niche.
Tools like Domain Wheel can be used to generate available domain names. It is advisable to select a popular domain name extension like .com, .org, or .net.
To get a domain, you need to use a domain hosting provider. In this guide, we use HostGator and recommend starting with the suggested Baby Plan.
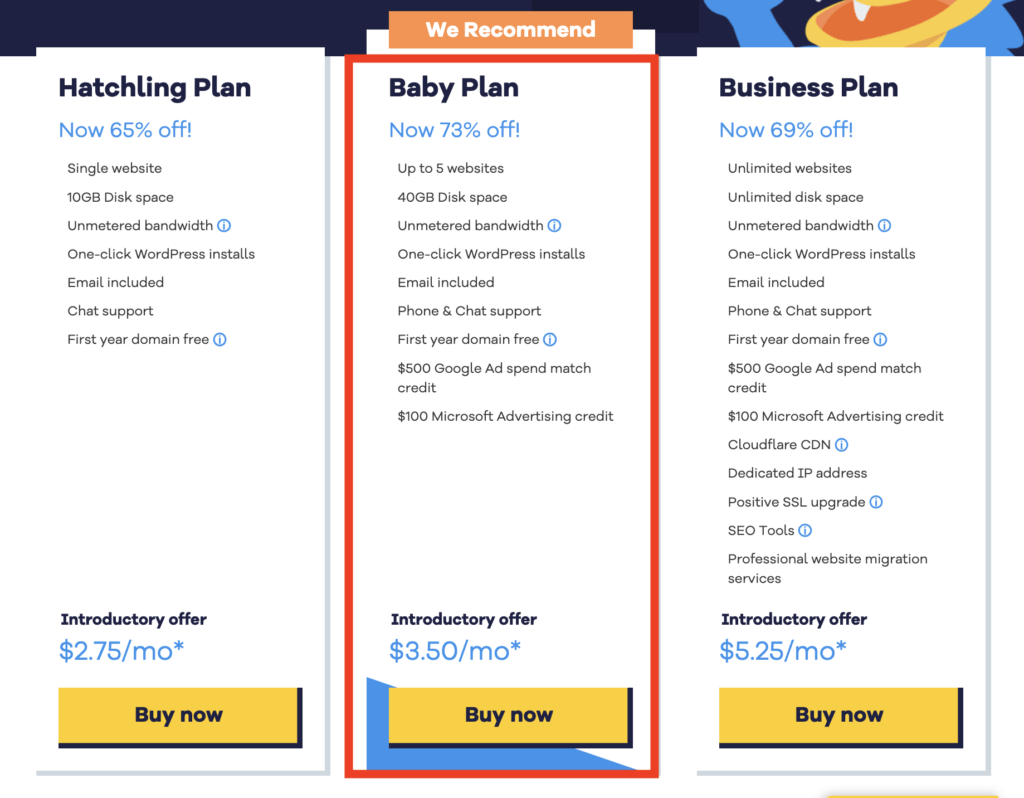
After choosing the plan, choose your domain name.
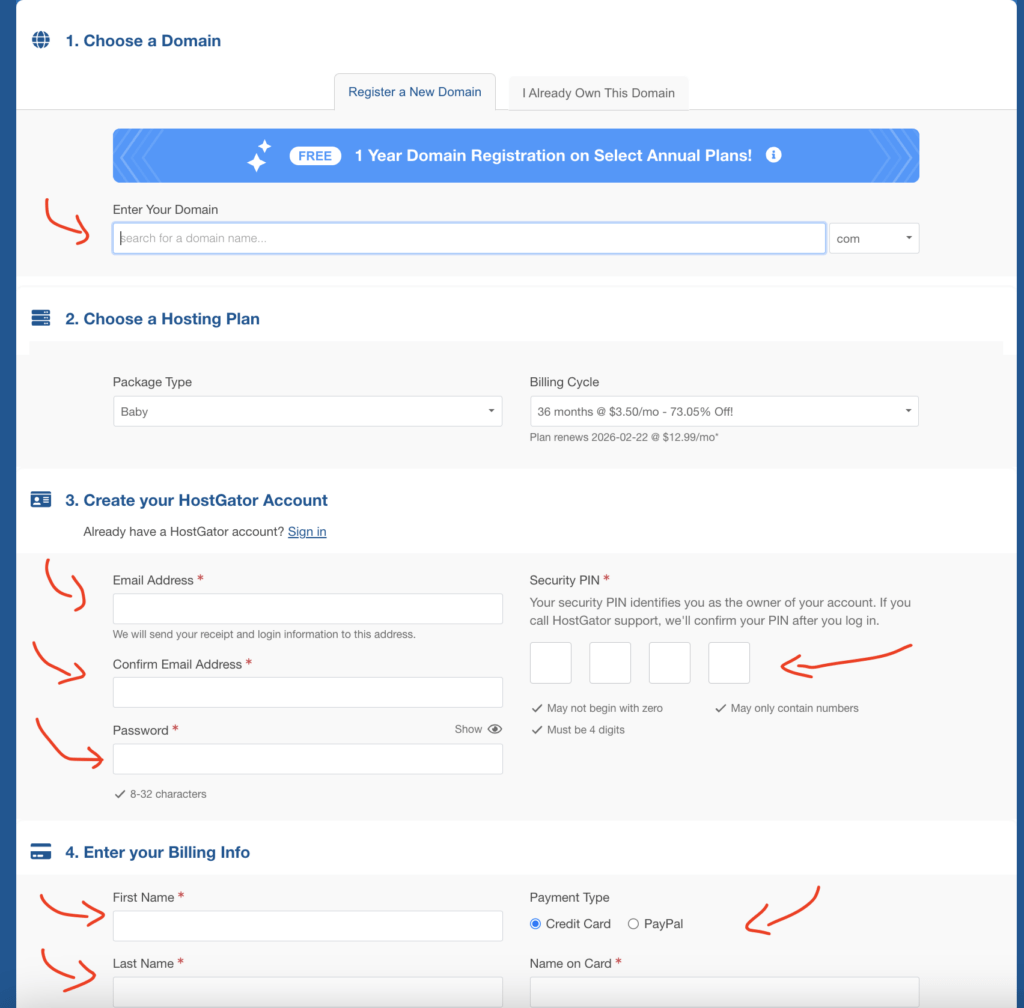
Then, fill in the necessary information to purchase your domain.
During this process, you will also create a HostGator account which will be required later on.
Once you have completed this step, you have your own domain. Congratulations!
To build an actual website behind your domain, you need a web host. As I mentioned earlier, the most common way to host a website is by using WordPress, which we will cover in the next step.
3. Install WordPress
WordPress is the most widely used platform for creating websites. This is all thanks to its ease of use and customization capabilities.
After registering your domain and creating your HostGator account, navigate to your HostGator dashboard.
Click on the “Hosting” tab located on the left-hand side of the screen and then click the cPanel button.
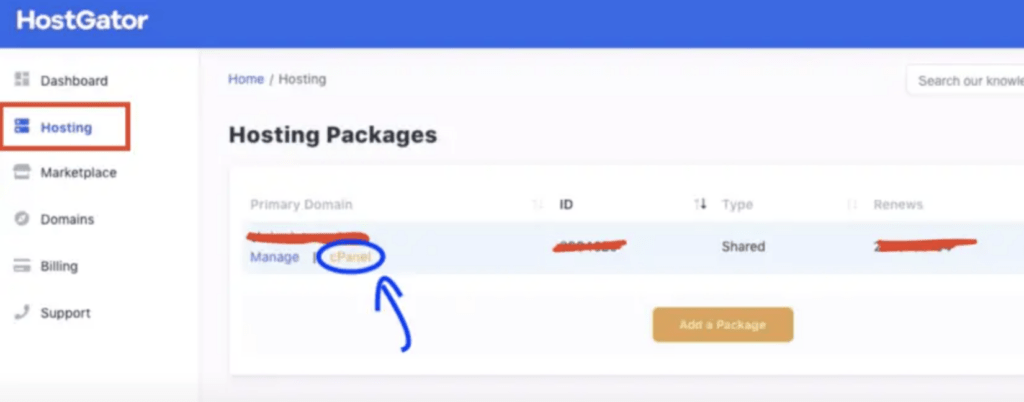
Then click “WordPress Installer” on the cPanel window.
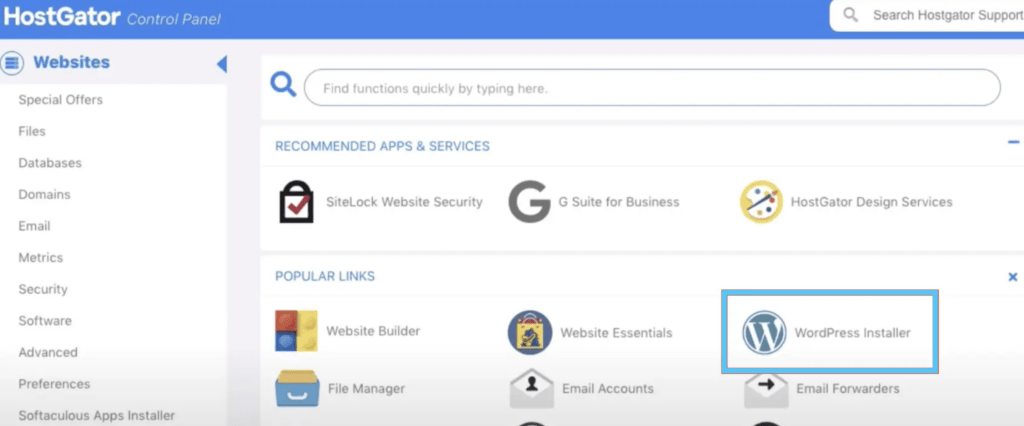
Select the domain you just purchased and click “Next“.
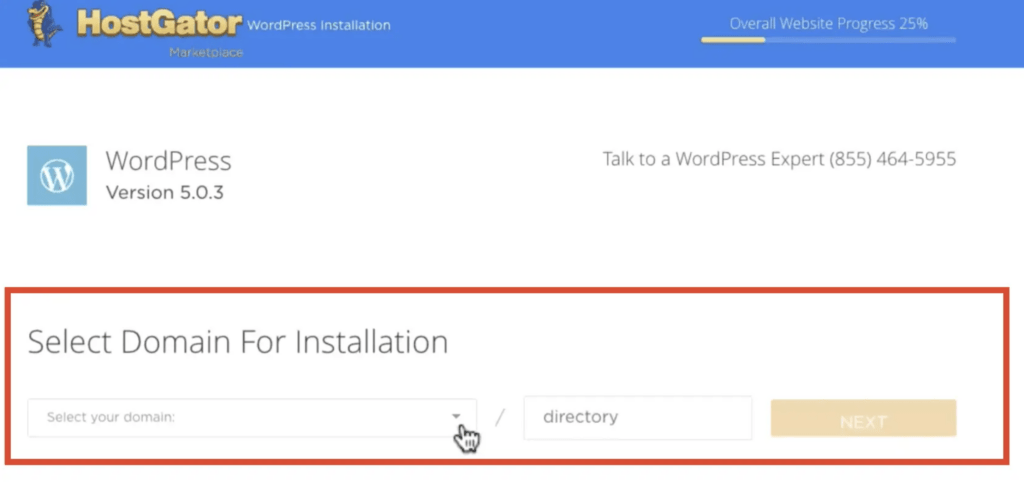
Then fill in your blog information on the form you see. You can easily change these later on.
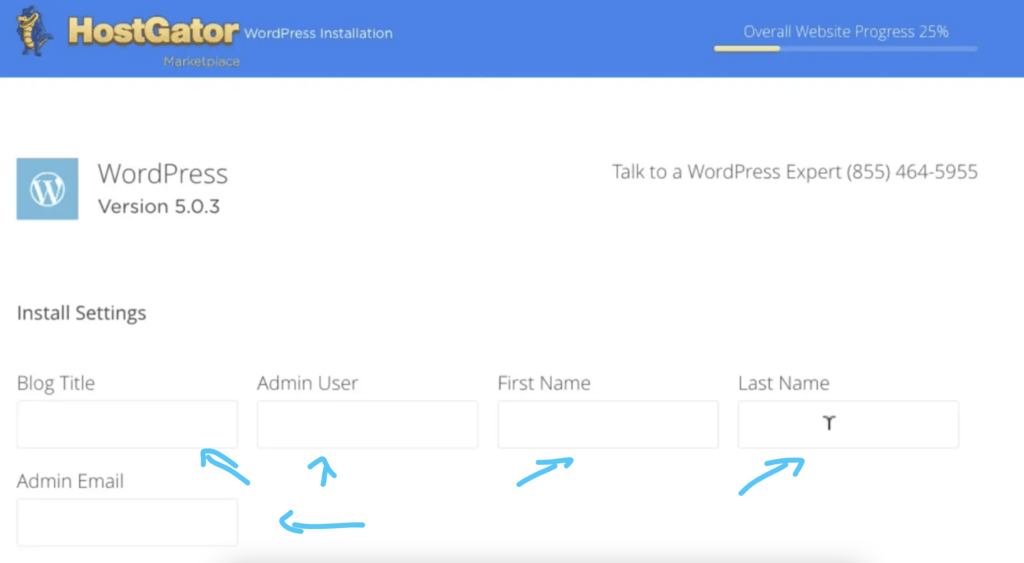
Accept the terms of service, and then click on “Install” to install the WordPress website on your domain.
Once the installation process is complete, you can log in to your website’s admin view. Your login credentials will appear in a window upon completion of the installation process. Copy the credentials and click on “LOGIN.”
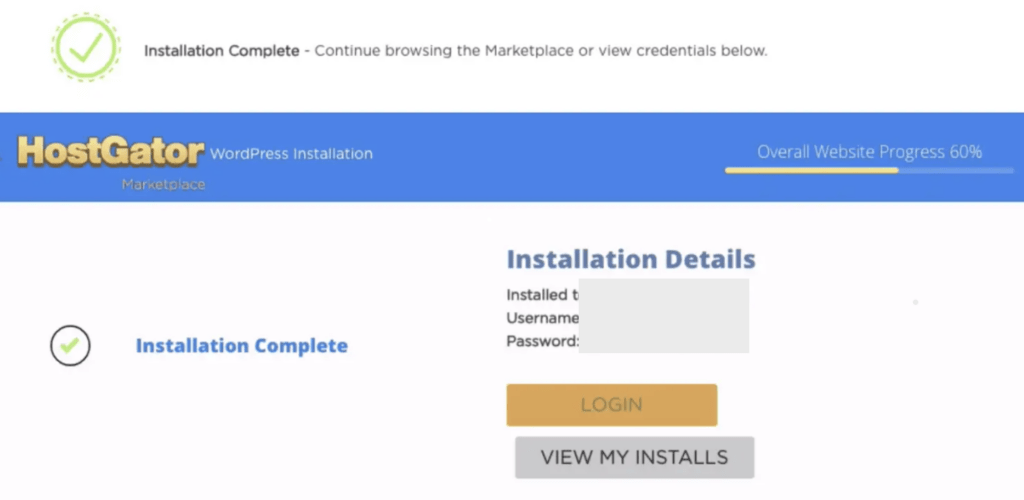
This opens up the login view to your admin user on your brand-new blog.
Here’s what the login page looks like:
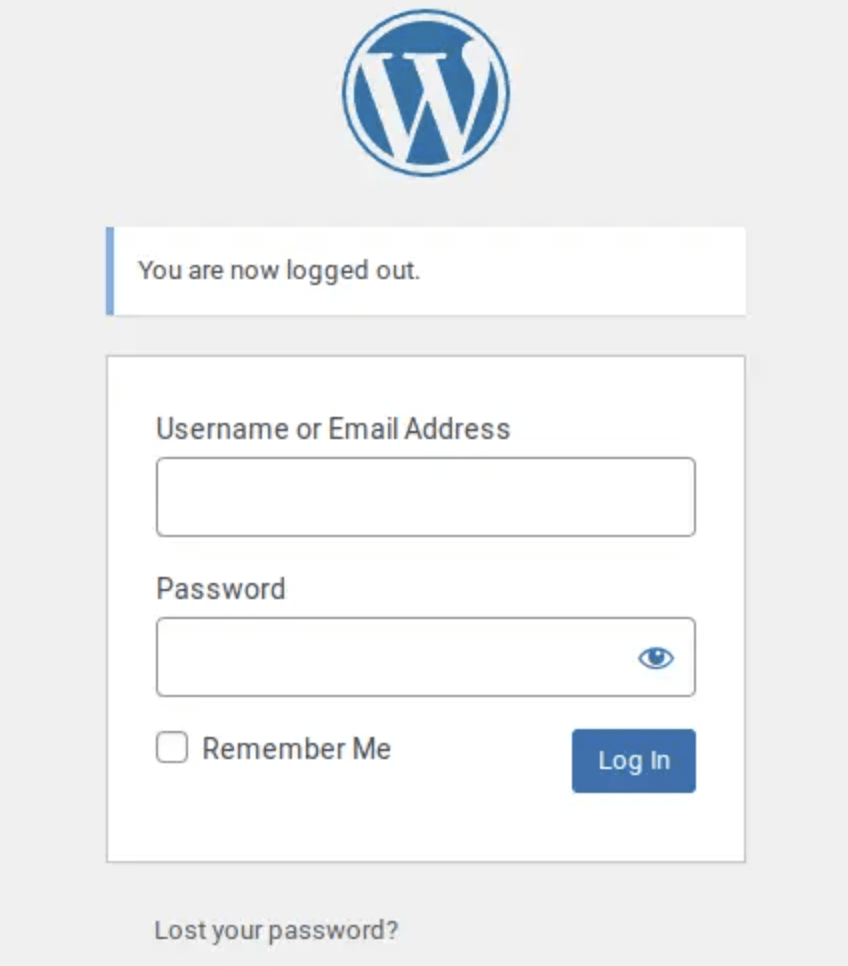
Enter the login credentials you received from HostGator into the login form and click “Log In.“
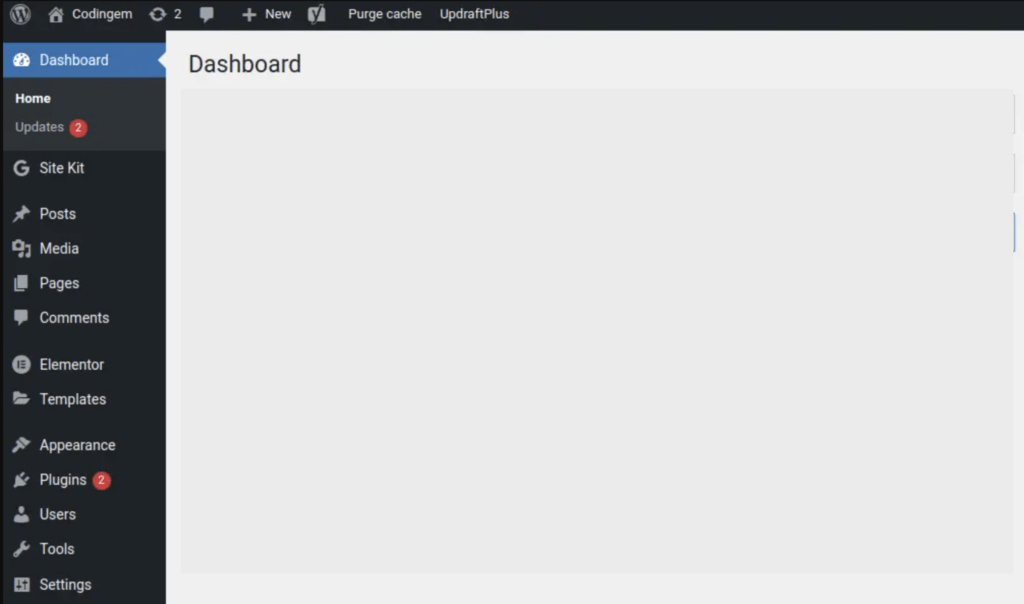
After logging in, you will see the WordPress dashboard. This is where you build and update your blogging site.
From this view, you can choose your website’s theme, change settings, and most importantly, start creating blog posts.
Now that you installed WordPress, you should have a website under the domain you recently purchased.
To view the website, enter the domain name into the URL bar just like you’d visit any other website.
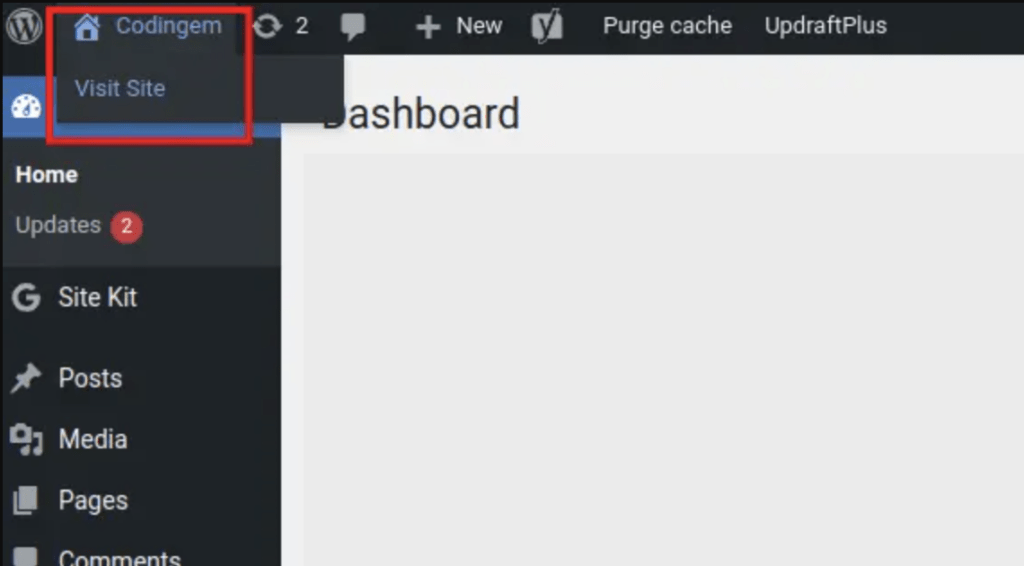
Alternatively, you can view your site from the admin dashboard:
- Hover your mouse over the top left corner where it shows your site’s name.
- Click on “Visit Site.“
At this point, you could already start writing blog posts for your site. But as you can see, the site doesn’t probably look the way you want. Also, it doesn’t have the necessary information, logos, pages, and so on.
To customize your site, let’s choose a beautiful theme.
4. Select a Theme
Initially, you should not invest too much time in the design of your website. Once you have built a large audience, you can consider spending more time and resources on the design aspect.
The quickest way to create a professional-looking website is by using a built-in WordPress theme. These themes are designed by professional designers and are of high quality. You can typically use these themes as-is.
To select a theme for your site, go to your WordPress dashboard (your-site.com/wp-admin) and select “Appearance,” then “Themes,” and “Add New“.
You can type something into the search bar to find themes. The most common themes are the Twenty-something themes.
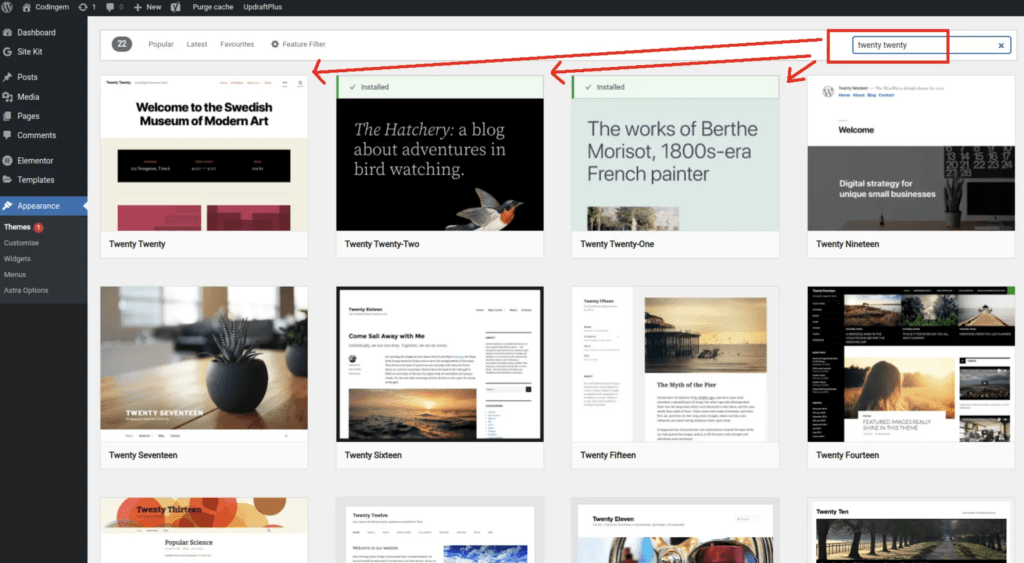
Pick one of these themes, click on “Install” and “Activate“. This applies the new theme to your site. You can visit your site to see the changes.
With a theme in place, you can customize the site to contain the right information.
- Visit your website (while logged in as the admin).
- Hover over some user interface elements.
- See a blue edit icon appear.
- Click on the icon to make changes.
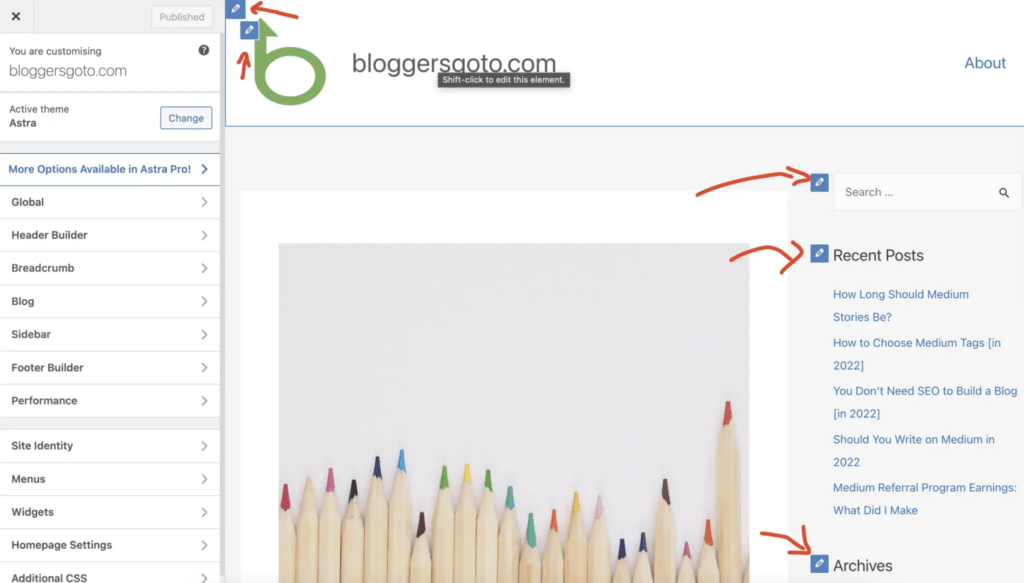
You can use this strategy to change any text or images that you don’t like.
Most themes allow you to change the:
- Background image
- Logo
- Footer settings
You can also adjust the basic settings of your site on the left-hand side of the customization view. These settings include options such as site identity, menus, widgets, homepage settings, and more.
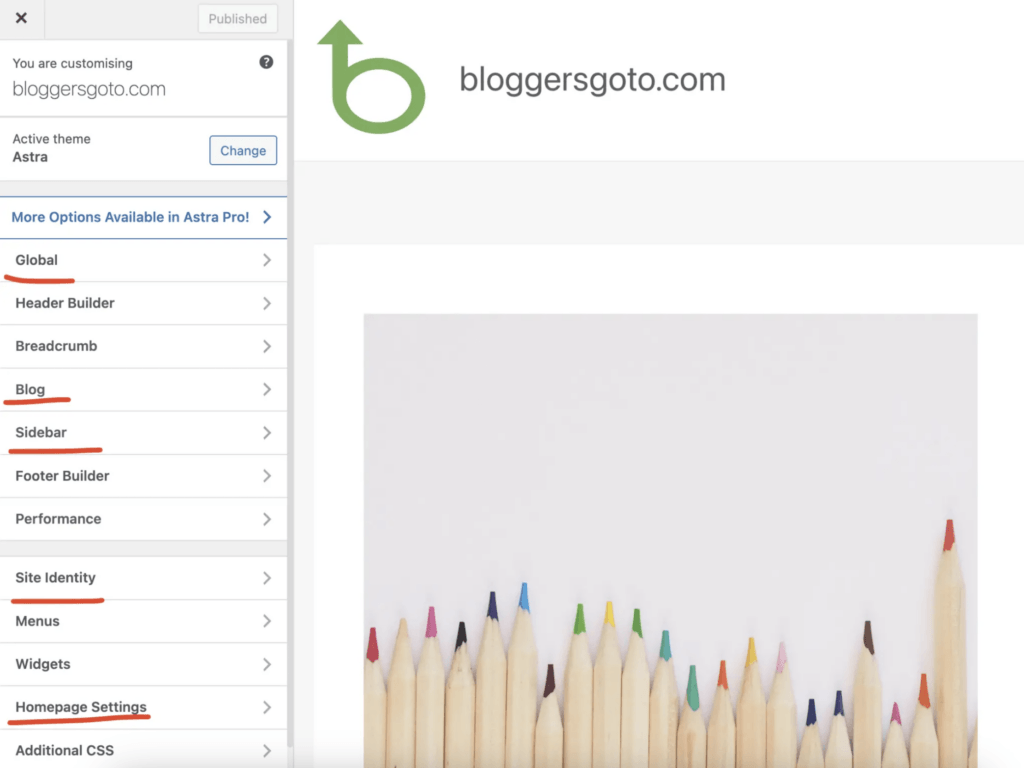
💡 Different themes have different options. There’s no generic guide that would show exactly what you can edit and how.
Luckily, the theme settings are easy and self-explanatory. It’s as easy as setting up a Facebook page.
Also, don’t worry too much about the details before you have a ton of reads.
5. Create the Important Pages
After customizing your site, let’s create a few essential pages for the future, including About, Contact, and Privacy Policy.
To create these pages, you need to know how to create a new page in the first place.
To create a new page:
- Go to the WordPress dashboard.
- Click on Pages.
- Select “Add New.”
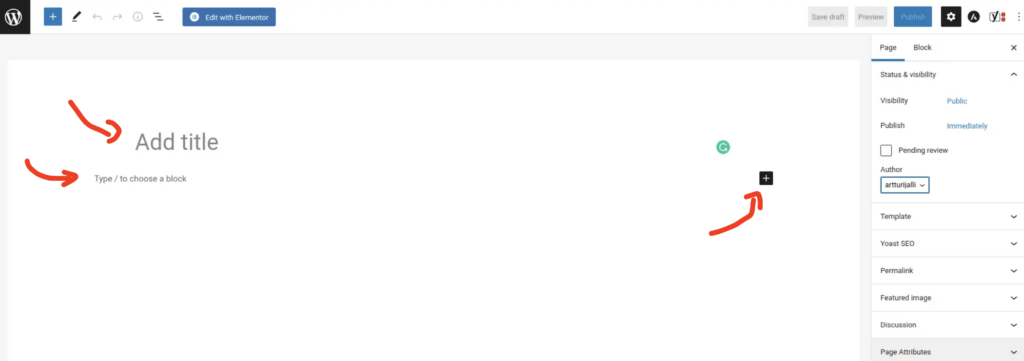
This view is the editor of the page you just created.
To add some text content like headings, paragraphs, lists, or images to the page, choose “Type / to choose a block”.
Once your page has all the necessary information, hit “Publish” in the top right corner.
If you’re not sure what to include in your About, Contact, and Privacy Policy pages, let’s take a closer look. Also, feel free to take inspiration from other blogs in your niche—that’s always a good strategy.
Page 1. About
The About page is an important component of your website. It allows you to tell your story and connect with your audience.
When creating your About page, consider sharing the following information:
- Who you are. Provide some background information about yourself, such as your name, occupation, and interests.
- What is your mission? Explain the purpose of your blog and what you hope to achieve with it.
- How readers can relate to you. Share some personal anecdotes or experiences that your readers might be able to connect to.
- Why readers should read your blog posts. Highlight what makes your blog unique and the value your readers can expect to gain from your content.
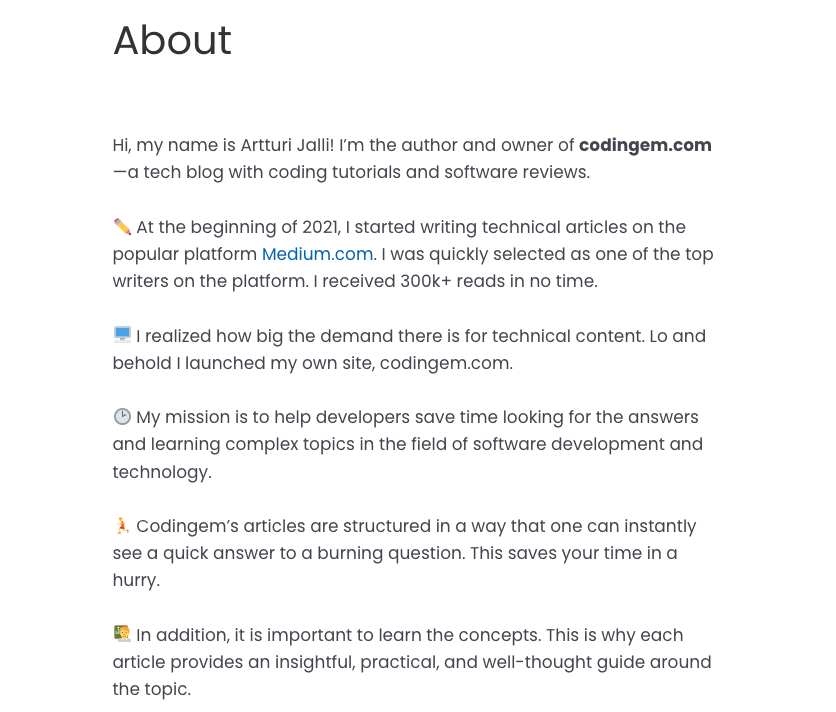
Remember, visitors want to read content that is written by a real person, not a robot or AI.
By sharing personal details and experiences, you can give your blog a relatable and human touch that will help you connect with your readers.
Page 2. Contact
A contact page should be straightforward and easy to navigate. Ideally, visitors should be able to see your contact information right away.
List your email address or other relevant contact information, such as social media handles.
As your audience grows, you may want to consider adding a contact form to your page to make it easier for visitors to get in touch with you.
You may also want to create an FAQ page to address common questions and concerns.
Page 3. Privacy Policy
Creating legal pages for your blog is an important step that should not be overlooked. It is important to have a Privacy Policy page to inform your visitors about how their data is being collected and used on your site.
To create a Privacy Policy page, you can use a tool that generates a custom policy based on your site’s needs.
Remember to review and update your policy as needed, especially if you start using new plugins or tracking tools on your site, such as Google Analytics or MailChimp.
How to Add the Pages to Navigation?
After creating the important pages for your website, you need to make them accessible to your visitors. Include the About and Contact pages in the main navigation menu of your site.
To do this, navigate to the Appearance > Menus section of your dashboard. From there, you can select the pages you want to add to your menu and drag them to the desired position in the menu hierarchy.
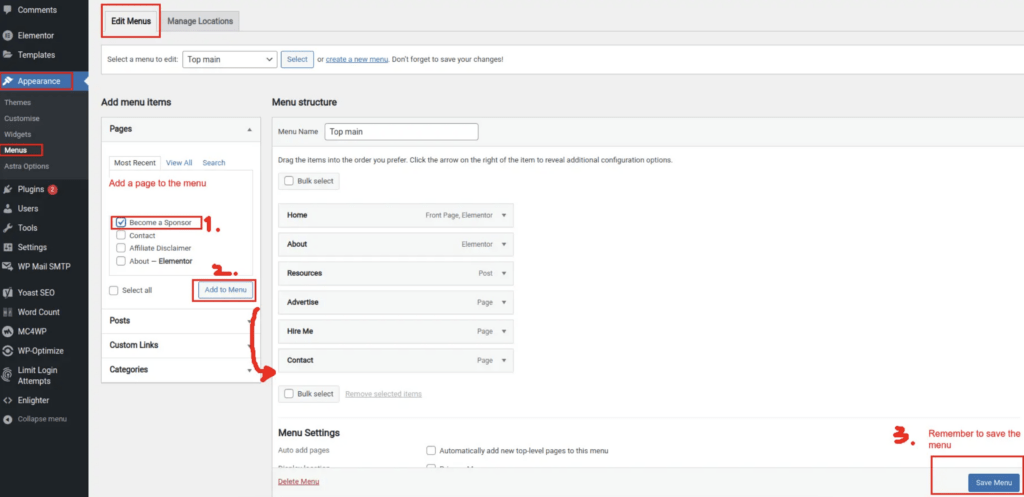
Make sure to save your changes. Also, preview your site to ensure that the new menu items are visible and clickable.
When it comes to legal pages such as the Privacy Policy, include them in the footer menu instead of the main menu.
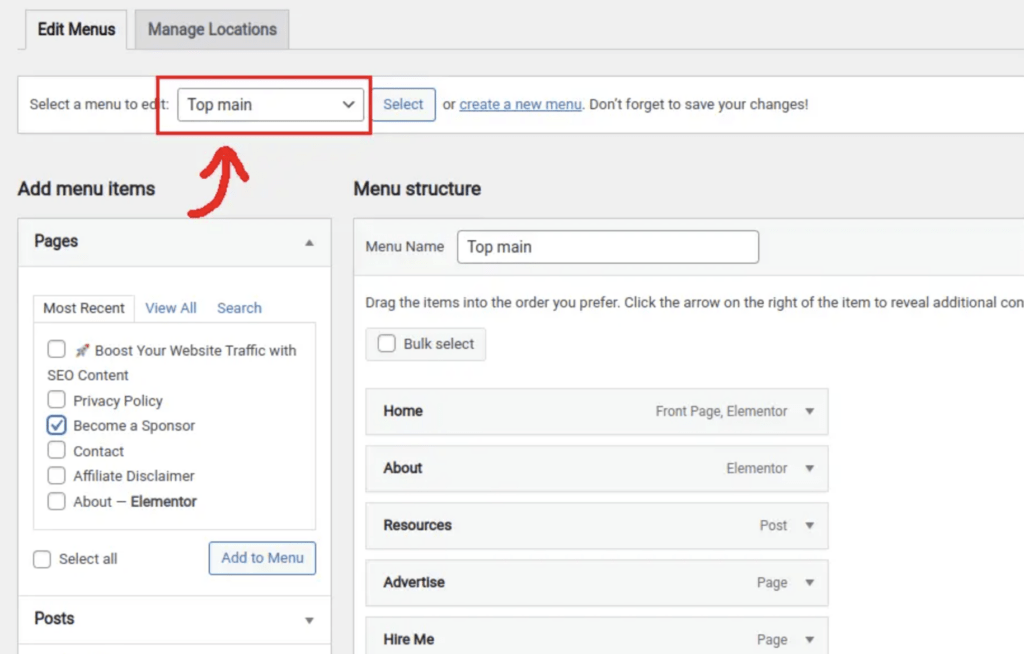
To modify the footer menu, navigate to the Appearance > Menus section of your dashboard and select the footer menu instead of the top main menu. If there’s no footer menu, you might need to add a new one.
6. Basic Configurations
To ensure that your blog post URLs are simple, let’s change the permalink structure of your website.
However, it’s important to note that you should only do this before you start writing blog posts.
If you’ve already published blog posts, changing the permalink structure will result in changing the URLs of all your pages and posts. This causes issues with search engines and existing links.
To change the permalink structure, navigate to your WordPress dashboard and select Settings > Permalinks.
From here, you’ll see a view that allows you to customize the URL structure for your site. I recommend choosing the “Post name” option, which will create simple and readable URLs for your posts.
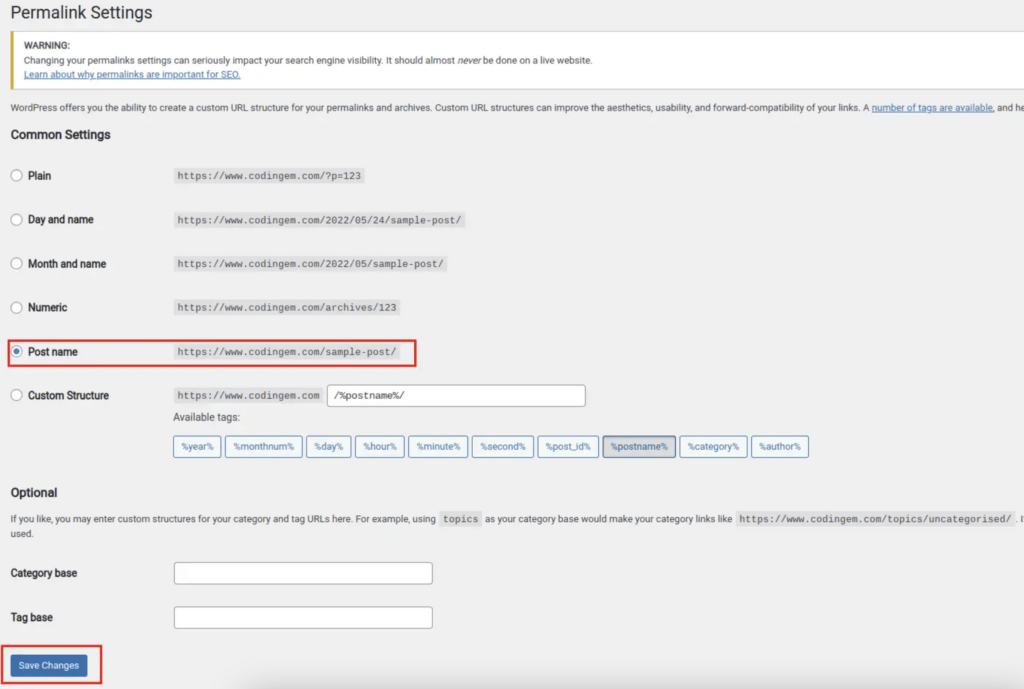
Click the “Save Changes” to complete the change.
💡 Selecting Post name URL structure makes your blog post URLs simple yet relevant to the content. One can easily tell what the post is about by just reading the URL.
This is useful for readers but also makes it easier for search engines to show your pages.
At this point, you’ve successfully created a blog. Congratulations!
Now you can start writing blog posts for your blog and let the blogging journey commence.
7. Start Writing Blog Posts
Writing quality content is the most important aspect of running a blog. It is also the most time-consuming part. To ensure you don’t just waste your time, you need to approach content creation in a smart way.
In this section, you will quickly learn how to write a blog post on WordPress. Later on in this guide, you will find a much more detailed guide for writing blog posts that actually rank.
How to Publish a Blog Post on WordPress?
To create a blog post in WordPress, go to your WordPress dashboard and click on Posts > Add New.
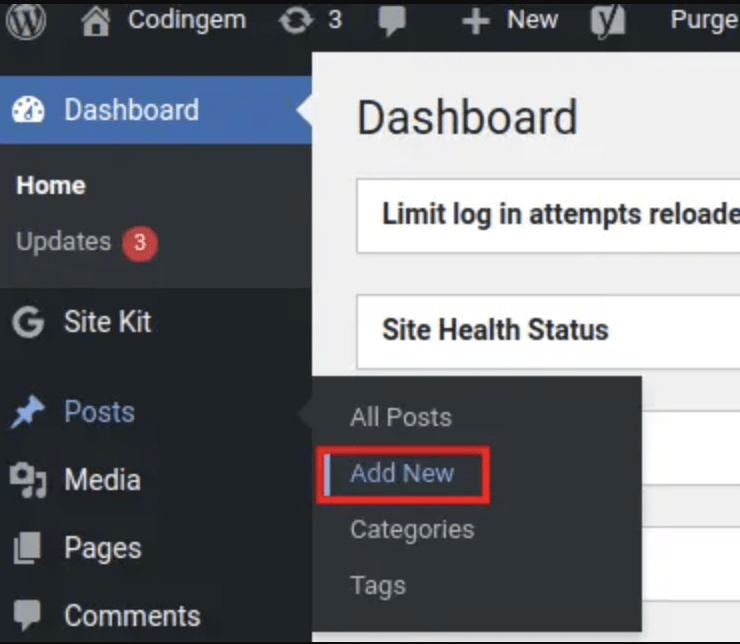
This opens up the blog post editor’s view. This is where you will write, edit, and publish your new blog posts.
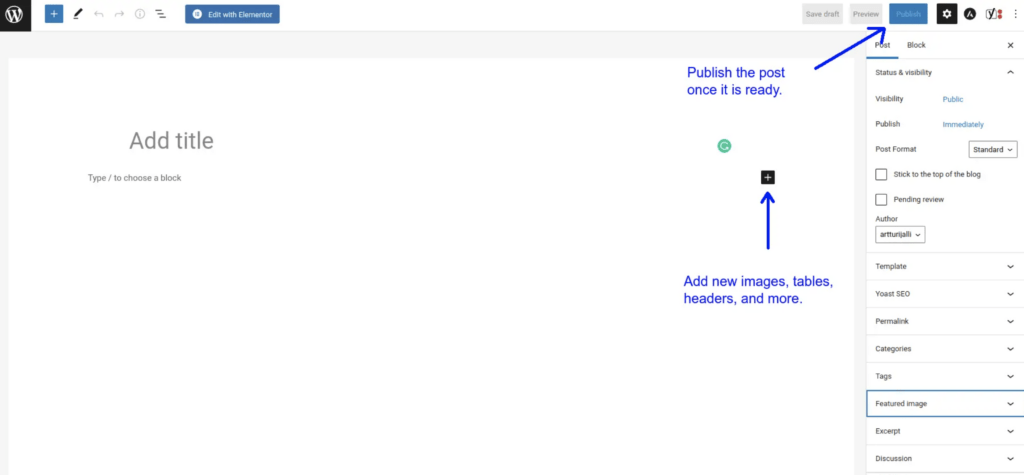
Make sure to play around with the editor. The controls are intuitive and easy to use. By clicking the + icon, you can add pretty much anything to the post, such as headings, paragraphs, images, and more.
When you’re done, click “Publish” to make your content go live. Most WordPress themes show the most recent blog posts on the home page automatically. Visit your site to make sure the post is there.
From now on, all you need to do is write and publish blog posts. Nothing else matters for the next months to come.
But writing a quality blog post is easier said than done. It’s not about writing what pops up in your mind. Instead, it’s a process that starts from looking for niche-specific topics to doing your research and writing out the post.
How to Write Blog Posts That Rank?
As a blogger, your main goal is to write blog posts that rank high on search engines like Google or Bing. If you manage to rank your blog posts high, they can bring in visitors passively for years to come.
To rank high in search results, your blog post needs to provide value.
In all modesty, your post must always be the most detailed, informative, and longest post about the topic on the entire internet. Otherwise, there’s no way to rank high! This is what 99% of bloggers get wrong.
Google and other search engines aim to provide the best possible answer to the reader. The more comprehensive your article, the higher the chances of it ranking high.
Here are some actionable steps you can take to write blog posts that rank. This process involves choosing the topic, doing the research, and writing the post.
1. Use Google’s Own Data—It’s Free
To write a successful blog post, you need to solve the reader’s problem.
But to know what problems readers have, you need to know what people are searching for in Google.
To get an idea of Google searches, use Google’s search suggestion feature. This shows suggestions based on what people commonly search for.
To use it, open up an incognito mode in Google Chrome or a private window in other browsers. Start typing something related to your topic in the search box, and observe the suggested results.

These suggestions will give you an idea of what people are searching for in relation to your topic. The key takeaway here is that you can use these search queries as topics for your blog posts.
2. Solve Visitor’s Problems
To grow your blog’s audience, it’s important to focus on writing content that solves a problem for your readers.
This is a common mistake many bloggers make. They write about topics they want rather than what people are actually searching for.
The previous step showed you how to find great topics by using Google’s own data.
But that’s not enough. To rank your blog posts high for a specific search query, you need to write posts that are more comprehensive and in-depth than any one of the top-ranking pages.
When you find a topic for your post, search for that topic on Google. Analyze the top 10 result pages carefully and make sure you write a better blog post than those.
Sometimes, this is called the skyscraper technique. If your competitor has built a 10-story building, you need to build a 100-story one.
It’s the same idea in blogging. You need to make sure your post clearly stands out from the existing ones. Otherwise, search engines won’t recognize your work.
3. Use Simple and Plain Language
A high-quality post doesn’t mean a post that uses difficult and cryptic language. It’s the opposite.
Avoid using overly complex vocabulary or technical terms. Instead, focus on clear and concise language that is easy to read and understand.
This not only makes it easier for your readers to understand your content, but it also makes it easier for you to produce content.
By using straightforward language, you can connect with your readers and build a more engaged and loyal audience.
4. Use Short Paragraphs
Keep in mind that many people read blogs on mobile devices.
To make your content more pleasant for mobile users, break up long paragraphs and use short chapters and sentences.
Avoid creating a “wall of text” effect that covers the entire screen, as this can be overwhelming and difficult to read. Instead, keep your chapters concise, with 3-4 sentences at most, to help your readers follow along easily.
5. Use Illustrative Images
Adding images to your blog post is a great way to make your content more engaging. Illustrative images can also support delivering your message.
Ideally, you should include an image for every 150 words you write.
But don’t just add images just for the sake of it. Instead, focus on using images that can complement the content and make it easier for your readers to follow along.
You can use free tools like AutoDraw to create illustrations for your blog post.
6. Add Internal Links
Internal linking can benefit your blog in many ways.
A technical reason is that search engine crawlers use internal links to discover content. If your article does not link to one or more of your site’s articles, Google might not find it, and it may not appear on search results. However, the most important aspect of internal linking is providing value to the readers.
By adding useful links you can suggest visitors relevant articles on your blog, making them stay longer on your site.
Avoid overdoing interlinking and only place links where they naturally fit. It’s okay to have articles without links if they don’t belong there!
7. Add External Links
Similar to how internal links can be helpful for your visitors, external links can be too!
Don’t forget to add useful links to back up your facts.
But remember to only link to reputable, truly useful sources. Avoid linking to low-quality or spammy websites, as this can harm the credibility of your own site.
Also, be sure to set external links to open in a new tab, so your readers don’t leave your site altogether.
Make sure to read my comprehensive guide to writing blog posts that rank high.
Now you should have a solid understanding of how to write blog posts that rank. Next, let’s take a quick look at promoting your content.
How to Promote a Blog?
Promoting your blog on social media is not mandatory—although it can give a nice initial kick to start getting those visitors.
While promoting your articles may give you a small traffic boost, it will not significantly impact rankings. Also, social media promotion is short-lived. Once your article has been in for a day or two, the social media visitors will go down.
Just keep this in mind when promoting! It can be useful, but you shouldn’t spend too much time doing that.
Here are some ideas to help you build your audience and increase your chances of ranking well on Google.
1. Social Media Posts
Social shares can have a positive impact on your blog’s Google rankings.
Sharing blog posts on platforms like LinkedIn and Twitter can help you get more visibility and attract new readers.
Remember to provide value with social posts as well. Don’t just share your article and expect to get reads. Instead, add a short back story and use relevant tags.
Use catchy featured images in your blog posts.
These images appear as the “thumbnail” of the article in a social media post, and a great featured image can increase the chances of someone clicking on your article.
Readers are also more likely to share an article that has an eye-catching featured image.
2. Online Forums and Communities
Forums like Quora or Reddit can be great resources for finding relevant information. They can also be useful for promoting your blog by answering relevant questions and linking to your blog posts.
But remember to bring value on forums too. Everyone has seen users who are there just to promote their work.
Here’s a bad example that shows how you should not do it:

Add useful and detailed answers and only then mention you’ve written an entire blog post about the topic. The idea is that if someone happens to be interested, they can read more from your blog. But don’t force it on them. Show that you’re happy to answer their question regardless.
Here’s a much better example:

Keep in mind that the click-through rate from an answer to a blog post is usually low—much lower than you’d expect. So don’t expect tremendous success with a promotion like this.
How to Monetize a Blog?
Monetizing your blog can be a great way to earn extra income. However, it’s not something you should put together until you’ve reached a decent amount of traffic.
Surely, when you’re starting a new blog, you need to make sure there’s money to be made in your niche. As stated earlier, you can do this by searching for relevant affiliate programs and seeing what your competitors are doing.
But don’t think about implementing monetization strategies until you reach at least 10,000 monthly visitors.
Once you have reached this point, there are several ways you can monetize your blog. Let’s take a closer look at the monetization options you have.
1. Ads
One of the easiest ways to monetize a blog is by displaying ads on the website.
Typically, potential earnings from ads are around $0.01-$0.02 per visitor.
For instance, a blog with 100,000 monthly visits can earn around $500-$1,000 from ads.
Notice that this amount depends on various factors like the ad network, content quality, number of ads, traffic source, content length, and more.
Of course, there are niches that might get 10-20x more (as well as 10-20x less). But most blogs end up in that $0.01-$0.02 per visitor range.
While displaying ads is a passive way to make money, there are also other methods to monetize a blog that we will discuss.
2. Affiliate Marketing
Affiliate marketing is a popular way to earn money through blogging.
Affiliate marketing means placing affiliate links on your posts so that if someone makes a purchase, you earn a commission
For example, if you promote a $50.00 training program with a 10% commission, you earn $5 for each purchase that happens through your link.
But keep in mind that adding random affiliate links to your blog posts isn’t enough. The links should be closely related to the content and be of high relevance to the readers.
For instance, on a blog post “Best Shoes for Squatting,” you could add affiliate links to your partner’s squatting shoes. If the product is highly relevant to the post, 1-2% of your visitors might make a purchase.
But if the product you promote is even slightly less relevant, the conversion rate will be surprisingly low.
If you add affiliate links to your blog posts, make sure to add a disclosure.

3. Freelance Gigs and Consulting
As your blog grows, you can leverage your platform to promote your own skills and services.
With a large readership, there’s a chance that there are business owners among your audience who may be in need of help with your expertise.
You can offer your services as a consultant or freelancer to provide them with the support they need.
Besides, you can always leverage your expertise in blogging skills to create content for others, which can be another way to monetize your skills.
Just don’t expect too much from this monetization strategy. Depending on your niche, you might need hundreds of thousands of visitors before anyone contacts you.
4. Sponsorships
A way to earn money with a blog is through paid collaborations. This involves having companies approach you to do sponsored posts on your website.
A sponsored post typically involves writing an article about a company’s product or service, which they pay you to publish on your website.
Super important: Always make the links both “sponsored” and “no-follow” with sponsored content.
99% of the sponsored content outreach emails are link-building scams where the “sponsor” pays you between $10-$100 to place a link on your site.
Never accept these—you can get your site permanently banned.
Alternatively, you can place a custom banner ad of a sponsor into your blog posts for a fee. It is important to note that before companies approach you with sponsorship opportunities, you need to have a sizable audience.

5. Get a Job
As a blogger, you can also use your blog to showcase your skills to potential employers or clients.
By demonstrating your knowledge and ability to explain complex concepts in a clear and concise manner, you can position yourself as an ideal candidate for job opportunities.
Make sure to have clear about/contact pages and social handles on your site so that potential recruiters can reach out to you.
6. Paywalled Content
If your blog has a significant number of regular readers, you can consider offering exclusive content behind a paywall.
However, it’s important to keep in mind that paywalled content can impact your Google ranking.
Moreover, you should have a dedicated and loyal audience that frequently visits your blog to read your articles before considering this monetization strategy.
I’m not a huge fan of paywalled content because usually the information can be found for free.
But if you happen to find a niche with demand but not a lot of great resources, go for it.
7. E-Books
One option for making money with a blog is to create and sell an e-book or course.
However, it is important to ensure that your audience is interested in the product before investing time and resources.
To test audience interest, you could try promoting someone else’s book through affiliate marketing and observing how well it performs on your site.
Keep in mind that this strategy requires a large and dedicated audience, and should not be pursued as a first monetization approach.
If there is not enough interest in the product, it could result in a waste of time and effort.
8. Sell Merch
Selling merchandise is a potential revenue stream for a blog.
You can sell products like t-shirts, stickers, notebooks, coffee mugs, and more.
You don’t even have to create or store these products yourself. Instead, you can partner with companies that handle the manufacturing and shipping for you.
However, it’s important to note that you need a significant and loyal audience to make this monetization strategy viable.
While the companies you partner with may take a cut of your earnings, it’s usually a better option than creating and storing products yourself.
9. Accept Donations
One of the many ways to monetize a blog is by starting to accept donations.
These days, setting up a donation button on your page is super simple.
- You can use PayPal’s donation feature
- Alternatively, you can set up a “Buy me a coffee” page.
Just keep in mind that you need a ton of visitors before some donations come your way.
Also, it’s ethical to use these donations to build your site. I’ve seen some blogs pay domain hosting fees and other writing costs with donations.
How to Track Visitors?
Understanding your audience offers you valuable insight.
To get an insightful overview of your website traffic, you can Google Analytics on your blog. From there you can track page views, average session duration, demographics, medium, source, and so much more.
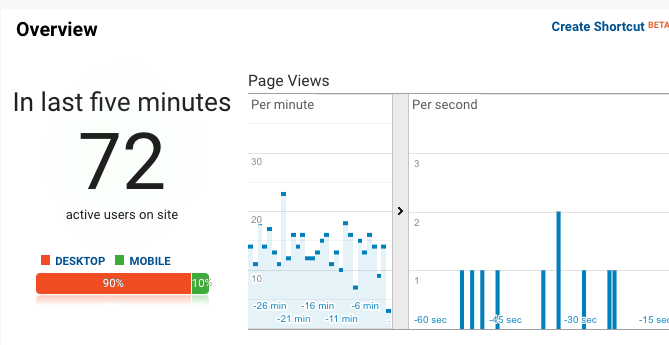
Google Analytics doesn’t only show Google-specific data, but also the traffic from other search engines like Bing, Yahoo, or Ecosia.
Besides Google Analytics, you should set up Google Search Console to track your Google performance.
From there you get more detailed Google performance reports that show trends for keywords you rank for, clicks, and the average position of your pages.
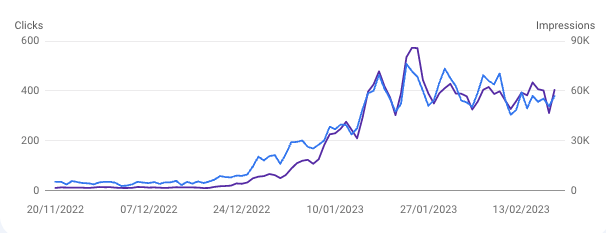
Also, you get valuable information on why pages appear/don’t appear on search results and if there are errors you need to fix to appear on Google.
By monitoring these metrics, you can identify which keywords and pages are performing well and which ones may need improvement.
Google Analytics and Google Search Console are two tools that can help you understand your traffic, track your performance, and identify areas for improvement. Setting up both tools is easy and recommended. There are plenty of guides available online to help you get started.
Just don’t stare at the stats too much. It’s enough to check them once a week or even once a month.
Tip of the Day: Block Yourself from Analytics
If you visit your own site frequently, it can skew the analytics and provide inaccurate information about your traffic.
Thus, you should block yourself from messing up the analytics.
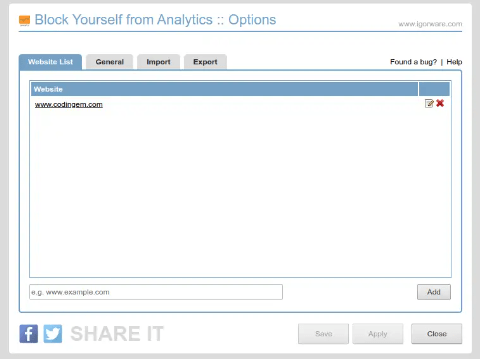
One way to block your own visits is by using the “Block Yourself from Analytics” extension in Google Chrome.
After installing the extension, you can click on its icon in the extensions bar and add your site to the list of blocked domains.
This will prevent your own visits from being recorded in Google Analytics.
How about SEO?
SEO (Search Engine Optimization) is one of the blogging space buzzwords. SEO increases the search visibility of your blog posts and makes them rank higher on Google. There are lots of shady strategies, expensive tools, and black magic in the SEO space.
But the truth is you don’t really need to know what SEO even means to build a successful blog. Surely, this wasn’t the case back in 2015 or earlier.
But these days Google is better at finding value in blog posts. It doesn’t matter what SEO keywords you use, or what SEO tools you pay for. If you don’t write quality articles that provide value to your readers, you won’t become a successful blogger.
Focusing too much on SEO can be misleading and shift your focus away from what truly matters. Just write a ton. Everything else happens naturally.
Of course, you need to use some common sense when researching blog post topics.
To outrank a venerable page like TechRadar for an article about the best laptops, you’ll probably fail. This is because search engines trust those older pages with tons of content and visitors more than your brand-new blog.
Useful WordPress Plugins
You might already know that WordPress provides various useful add-ons called plugins.
Most of these plugins are available for free and can be easily installed.
To install a WordPress plugin, you can access your WordPress dashboard and navigate to the “Plugins” section followed by “Add New”.
This will take you to the WordPress plugin store view.
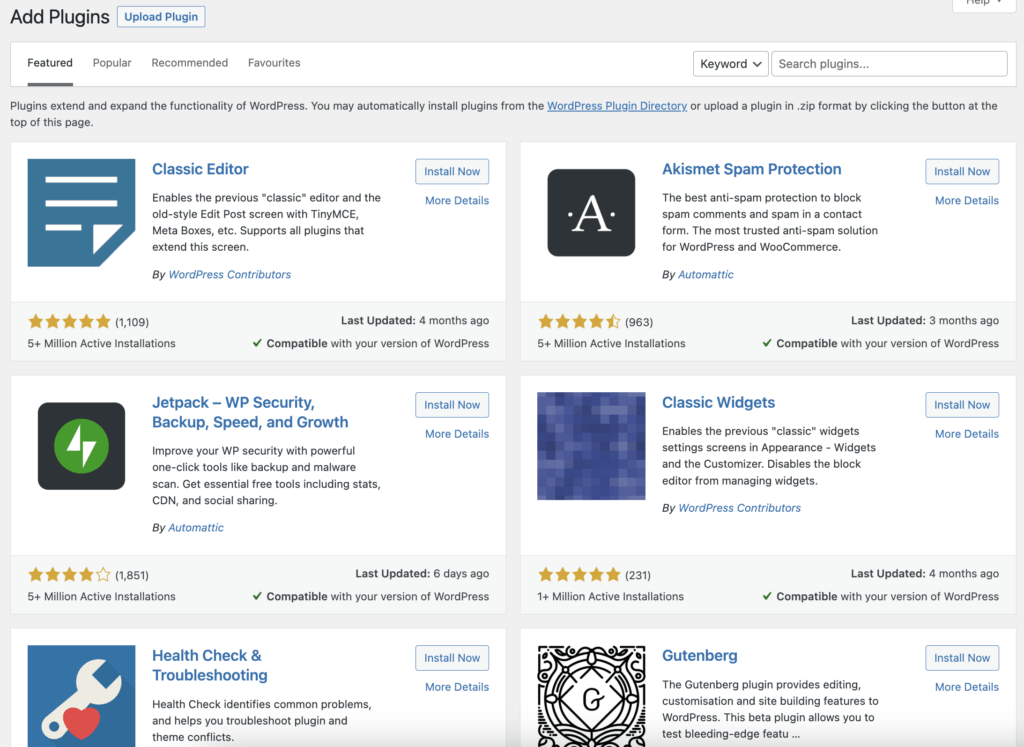
To find and install a plugin, you can use the search bar located at the top right corner of the screen. Click “Install Now” to install a plugin, and then click “Activate” to activate it.
Each plugin is different and has its own set of features and functions, which you can learn more about by viewing the plugin’s manual pages. Typically, a new plugin will create a new entry in the WordPress dashboard on the left-hand sidebar or in the settings section.
When choosing a plugin, it’s important to only select those with high ratings and frequent updates. Installing too many plugins can also slow down your website, so be cautious.
Here are some useful WordPress plugins you may want to consider.
1. Google Site Kit for Analytics
You can use Google’s Site Kit plugin to connect your website with Google Analytics and Google Search Console.
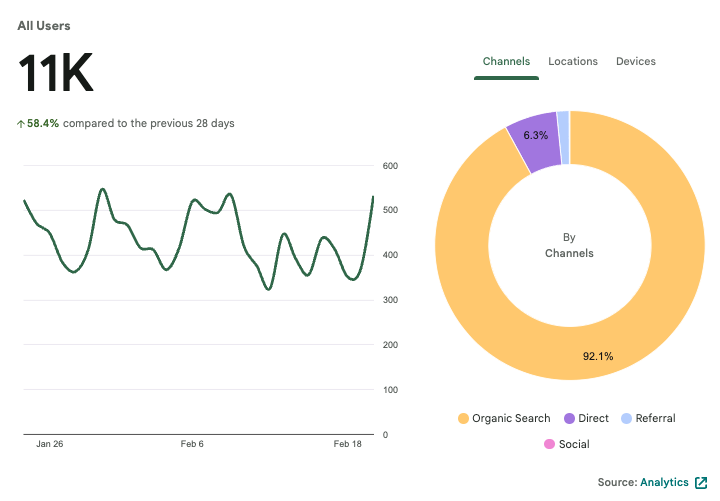
This plugin provides a visual dashboard in WordPress, which displays the most important metrics on your site. It’s a convenient way to quickly view your analytics data.
2. UpdraftPlus for Backups and Restoration
To prevent losing all your hard work, it’s essential to keep a backup of your WordPress site.
Although data loss is pretty rare, there’s always a chance that something goes wrong. I recommend starting to back up your work right away.
The UpdraftPlus plugin is an excellent choice for taking frequent and automatic backups. You can find it in the WordPress plugin store and activate it to set up the plugin wizard.
Make sure to set a regular backup interval, such as once per week, to ensure that you always have the latest backup of your site.
3. Yoast for Search Visibility Polishments
With the Yoast SEO plugin, you can change the meta title and description for your blog posts. Those are the ones you see in the search results before opening the page. You can also change the URL slug with Yoast.
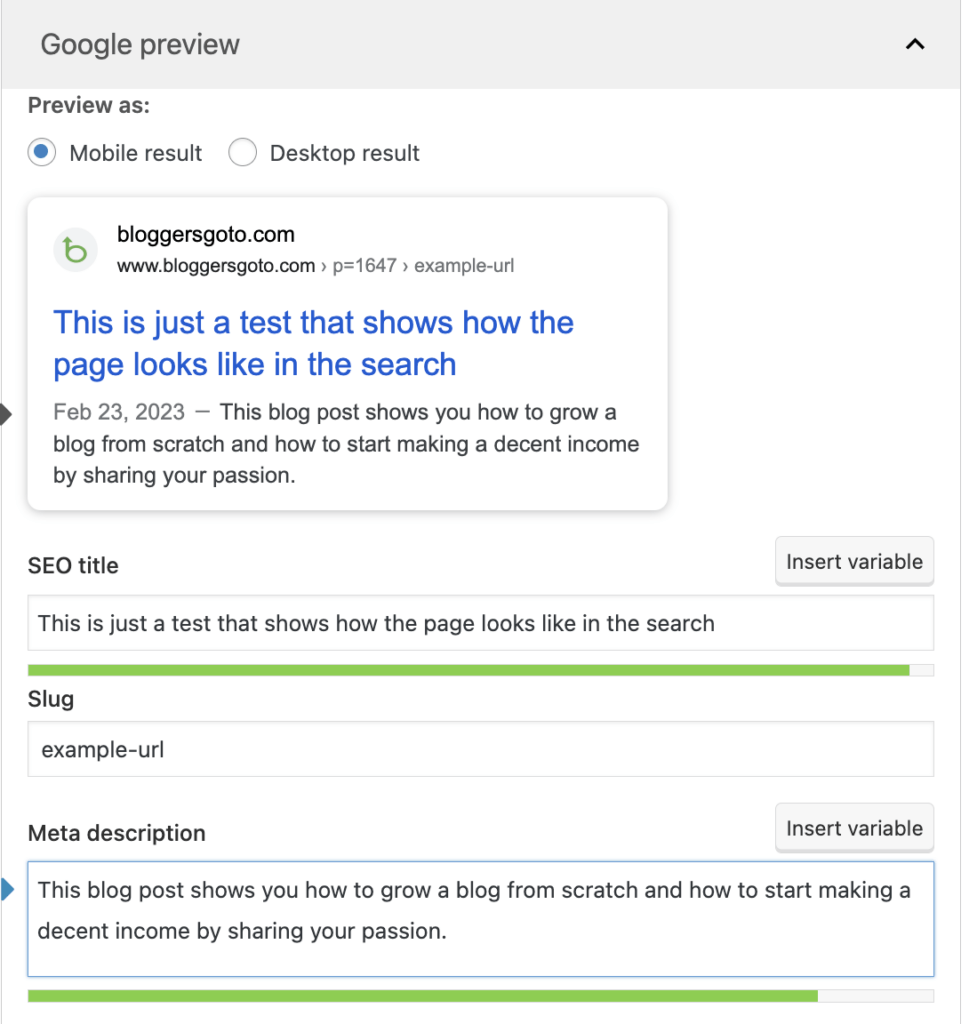
You can search for Yoast in the WordPress plugin store and install it on your site.
Notice that there are other SEO features in Yoast. You don’t really need to worry about those but of course, you can explore with the tool. In my opinion, this plugin just offers a nice way to set up your page and blog posts for search engines.
Blogging FAQ
Last but not least, let’s go through some common blogging-related questions.
How Long Does It Take to Rank on Google?
The process of ranking on Google can take a long time, and there is little you can do to speed it up.
During the first 6 months, I only received a total of 500 visits from Google.
You heard it right—I wrote 50 hours a week for half a year to get 500 reads. That’s about $5 in ad revenue.
As a beginner, you should expect it to take several months to start ranking on Google.
If you choose highly competitive topics, you may never rank at all. Even if you select less competitive topics, it could still take months or even a year to rank on Google.
But once the momentum has built up, you will see a nice exponential growth for a couple of months at least.
While some search engines might rank your content more quickly, Google is the most important traffic source, accounting for 92% of all searches.
Do You Need to Be an Expert to Start a Blog?
It is not necessary to be an expert in a particular subject to write an informative blog post about it.
If you have recently learned something new and valuable, you can share your newfound knowledge with others through a blog post.
But don’t lie to your audience. Pretending to be an expert when you’re not is dishonest and will likely damage your reputation in the long run.
How Long to Build 100k+ Monthly Visits?
By working both hard and smart, you might see nice decent success in 6 months.
However, if you don’t work efficiently or only dedicate a few hours per day to your blog, it could take several years to see results.
It’s important to work hard and smart but remember that success is not guaranteed, and it depends on various factors such as the quality of your content and the competitiveness of the topics you cover.
Should I Use AI to Write Blog Posts?
While AI can certainly assist in writing blog posts, it is not yet advanced enough to generate entirely new content without human input.
AI tools can be used to rephrase sentences or conduct basic research, but the creation of something entirely original still requires a human touch.
AI may write faster, but the groundwork is still the hard work that takes time—and it’s something you can’t avoid.
Wrap Up
Starting a successful blog is a long and challenging journey. It requires a significant amount of work, dedication, and perseverance.
You write blog posts to solve visitors’ problems. Treat each blog post like a tiny business. You want to make it so good that there’s no need to search for an alternative.
Earning a full-time income from your blog is possible, but it demands both hard work and smart strategies. It takes 1-2 years of full-time work.
